READ TO USE CREATIVE ASSETS
This tutorial, you will learn how Adobe Photoshop Legs make a beautiful Photo Editing. You can view the animated image effect below.
Tutorial Details
Program: Adobe Photoshop CCEstimated Completion Time: 15 Minutes
Tutorial Assets
In making this tutorial, I used the following written activities:Photo Editing - We will use an background image in this Photo Editing that we have taught in this tutorial.
Now that we have everything we need, so let’s start!
Step 1: - The image to be edited will Open the image at the Photo Shop.
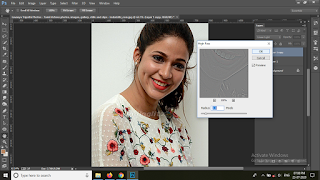
Step 3: - After this, click on the Linear Light by clicking on the Normal side near the Opacity on the Layer Menu, and then clicking on the Filter Menu in the Menu Bar and clicking on the High Pass in the Other Option. The dialog box will be open, in this Radius has to do 2.0 Pixels.
Step 4: - After that click on the Smudge Tool and right click on the Image, to clear the Image in the Dialog Box, take the tool from the Smudge Tool and change the size of the tool, then zoom the Image cleanly. You have to do it and you have to keep the time Strength above 25% while cleaning the hair and the Strength should be maintained at 25% while cleansing the face. And you can also change the tool from the Smudge Tool while cleaning the face. In this way, you have to clean the entire Image and show the clarity in it.
Step 6: - After cleaning the Image, we have to apply redness on the lips, for this, we have to click on the Create new fill or adjustment Layer below the Layer option, click on Solid Color and then take the color of the lips and then Ctrl+I from the Keyboard. You have to push the Button and then click on Normal in the Layer option and click on Soft Light and fill the Color lips with the help of Brush Tool.
Step 7: - After cleaning the Image, to see the brightness in the Image, click on Create new fill or adjustment layer below the Layer option and click on Hue/Saturation. After clicking, a Dialog Box will open in front of us. You have to change Hue/Saturation according to your Image. Which will shine in your Image.
Step 8: - After this, to increase the light of the Image, push Ctrl+M from the Keyboard, a Dialog Box named Curves will open in front of you, in such a way that we can increase the brightness in the Image and in this way we create an Effective Image.
In this way you can made a beautiful realistic digital oil portrait painting art .
Beautiful realistic digital oil portrait painting art in Adobe Photoshop
If you want to get Beautiful realistic digital oil portrait painting art effect in your Image, then you can Contact me.


Wow nice to learn
ردحذفإرسال تعليق